Magyar
  English
  Deutsch
BLOG
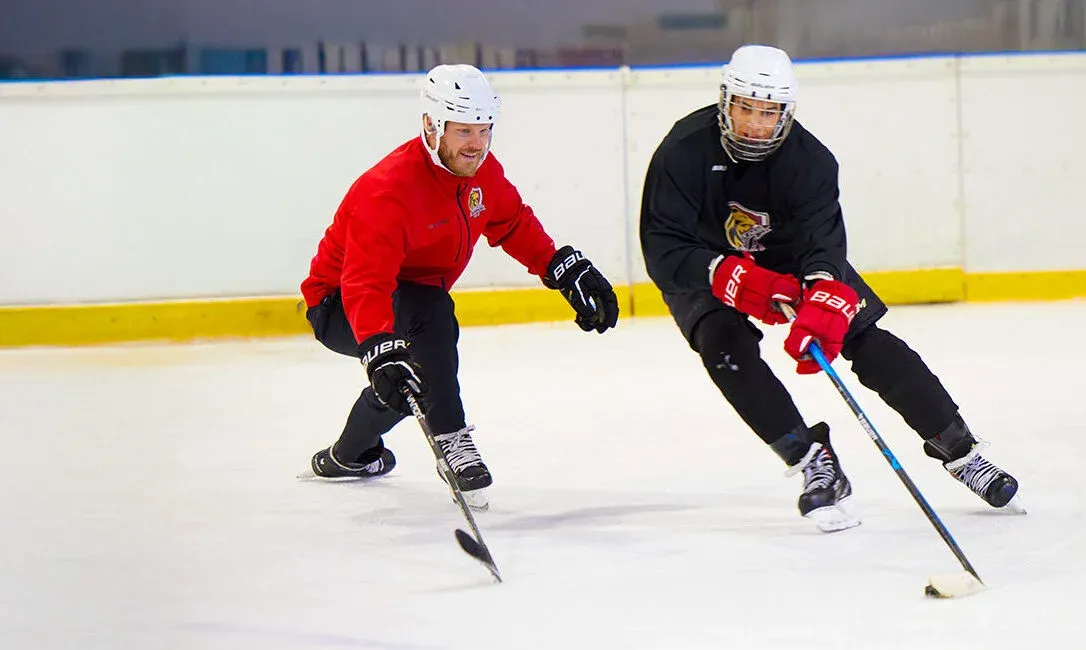
Why Skating Is the Most Important Skill in Hockey?
Skating ability is what determines adult careers most decisively. Poor skating is a weakness that is impossible to compensate for at the elite level - skate anatomy, selection, and proper use.
NHL coaches and experts often emphasize that among all skills, skating speed determines adult careers most decisively, though it serves more as a critical foundation upon which everything else is built. It may not be surprising that at NHL drafts, skating abilities are frequently decisive, since poor skating is a weakness that is practically impossible to compensate for with other strengths at the elite level - whether that means outstanding hockey intelligence, shooting technique, or physical attributes.
Skating technique is the earliest skill to learn and everything else is built upon it. Until a player skates well enough, it is not worth spending valuable ice time on skills that will never be used, or on learning tactics. Skating technique is the foundation of the game - without it, you cannot shoot stably, play as a team (see stationary hockey), or make smart decisions. In our player development series, we cover skate anatomy, proper selection, and correct use.
At the beginning of youth development, among all equipment, the choice of skates is the most important for rapid learning, as it ensures efficient energy transfer, acceleration, cornering speed, and balance. A well-fitting skate (proper size and heat-molded) supports a lower center of gravity and promotes ankle mobility.
A poorly fitting (e.g., rental) or poorly laced skate significantly hinders learning ice hockey in childhood. Such a skate tires its wearer more quickly by worsening balance, and increases the risk of injury. Although it does not make learning impossible, it leads to slower and more frustrating development, and also instills bad movement patterns. A bad skate slows children’s learning and the absence of feelings of success can even put a child off hockey.
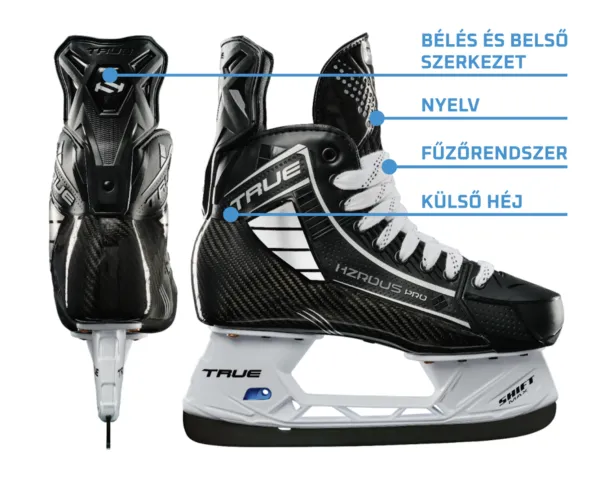
Skate Anatomy
Today’s models are made from advanced materials to be lightweight, rigid, and durable. We divide the skate into two main parts: the boot and the blade:
The boot is the upper part of the skate, which holds the foot and protects it from falls, impacts, and shots. Modern versions are ergonomically shaped to fit the foot perfectly:
-
Outer shell: Generally made from synthetic materials such as composite plastic, graphite, or carbon fiber composites, which provide rigidity. The stiffness is scalable, which improves energy transfer from the foot to the ice.
-
Lining and inner structure: Made from moisture-wicking, breathable materials, typically heat-moldable so it takes the shape of the wearer’s foot. Contains ankle protection, heel stiffener, and toe cap.
-
Tongue: A thick, padded part that protects the ankle and instep. Modern tongues often feature extra protection.
-
Lacing system: This regulates the fit.
 Source: Jégvilág Hockey
How to Lace Your Skates? A Few Moves Can Tie Up Your Career
Have you ever tried to shoot or deke with a fixed/immobilized wrist? Yet in a game, you only have the puck 5% of ice time, but you are skating 100% of the time (hopefully). Mobile ankles allow deep knee bend, proper blade tilt, and efficient power transfer. They stabilize the center of gravity, reduce the risk of falls, and support the development of proper posture.
If the ankle is overly restricted (e.g., by tight lacing or a rigid skate), it limits movement, reduces performance, and hinders long-term development. Since the load shifts from the ankle to the knee joints, it increases the risk of knee injuries. In children this is especially harmful, because their developing bones and ligaments are far more sensitive. Free ankle movement reduces muscle fatigue, optimizes energy use, and enables safer, injury-free play.
In the long run, a locked/tightly held ankle locks in bad movement patterns, because the child does not learn to move their center of gravity with the ankle and to use the edges correctly, hindering mechanical development (e.g., small shin-angle). This slows down virtually every element of their game.
 How far can the knee be pushed forward? Ankle bend - shin angle / Source: train2point0.com
Because for children (due to smaller muscles and weaker ankles) the relative stiffness of skates can be 2-3 times greater than for adults. This limits dorsiflexion - ankle bending - which affects everything:
-
worsens deep knee bend,
-
makes edge use more difficult,
-
due to the higher center of gravity, slows balance development and cornering speed,
-
increases fatigue due to compensating muscle use (hip/knee),
-
and the extra load on the knee raises the risk of injury.
For beginners this particularly hinders correct posture and significantly reduces the rate of learning.
In the past, the playing style itself required less knee and ankle bend, so a tightly laced ankle was ideal: it transferred force directly and in a straightforward way onto the blade, while providing extra soft boot protection for the ankle. Today, however, the situation has completely reversed: modern skates are inherently extremely stiff and are molded directly to the player’s foot, so leaving the lacing looser is necessary for ankle mobility - this enables deeper crouching, faster turns, and longer and more powerful strides. Of course, this requires strong ankles and a perfectly fitting skate, otherwise the whole thing becomes unstable and hazardous.
What can be done? For young players it is worth choosing lower-stiffness youth models, applying looser ankle lacing depending on skating ability (e.g., skipping the top eyelet), and re-heat-molding multiple times due to growth.
How Do the Stars (NHL Players) Lace Their Skates?
NHL stars’ lacing is often personalized based on biomechanical considerations - many consult with trainers or physiotherapists to maximize their speed, but the general trend is that pros rarely lace up fully (or pull with full force) the top eyelets, because this restricts ankle movement:
 McDavid with the top eyelet skipped // Photo: nyt.com
 Crosby skips the second eyelet when lacing / Photo: reddit.com
-
Sidney Crosby: He prefers a tighter ankle, but with waxed laces and the second eyelet skipped, making his ankle more mobile.
-
General pro habit: The top 2-3 eyelets are laced more loosely or with 1-2 eyelets skipped, to avoid stiffness in the upper part - though this is a subject of debate in hockey science circles, it is popular for the speed improvement it brings. The Florida Panthers coaches emphasize the method: tight lacing at the bottom, looser at the top for better performance.
Types of Laces
Laces fall into two categories: waxed and non-waxed. Within that there are round and flat forms, as well as special variations. Choose based on your playing style: waxed for pros, plain for beginners/those who prefer comfort. Here is a table summarizing the pros and cons:
Type Description Advantages Disadvantages
Waxed Wax-coated, stiffer lace. Generally round or flat.
-
The tight lacing holds (does not loosen from moisture or sweat).
-
Easier to control tight/loose sections.
-
More durable, moisture-resistant - ideal for pro games.
-
Better grip, less knot slipping.
-
Stiffer, harder to tie/tighten at first.
-
Less comfortable.
-
More expensive.
Non-waxed Soft, fabric-based lace, more flexible, often flat.
-
More comfortable, softer feel.
-
Easier and faster to lace/tie.
-
Cheaper, ideal for beginners.
-
Better flex for natural movement.
-
Loosens quickly from moisture, needs tying more often.
-
Less durable, tears more easily.
-
Poorer moisture management (slippery when sweaty).
If you play at a pro level, start with waxed flat (e.g., Howies Waxed Laces) for durability - 70% of stars use these. For beginners, unwaxed round is recommended for comfort.
The Blade
The blade is the lower part of the skate that contacts the ice, made of stainless steel or more advanced alloys (e.g., high-carbon steel), with a thickness of 3-4 mm and a length of 25-30 cm. They are not flat but curved (profiled) to optimize grip/control and glide.
Grip, Glide - What Are These?
A player’s skating technique is determined by two main properties of the blade: grip and slide (edge grip and glide). Edge grip is determined by the blade’s edges - that is, by sharpening and profiling. In general, this determines how much the skate bites in a turn, how fast and sharply you can corner. Poor edge grip makes the hockey stop easier but makes cornering unstable, while strong edge grip makes the hockey stop (and any other transition) more difficult but makes cornering more stable. Stronger grip comes from a smaller-radius hollow, less grip from a larger hollow.
Glide refers to straight-line speed, where the naturally quasi-liquid layer (QLL) on the ice surface reduces friction. It is very easy to imagine this: if a player pushes off a board in a straight line, a skate with easier glide will slide further. A larger-radius hollow provides lower friction, meaning the skate glides more easily and further on the ice. Less resistance - that is, better glide - comes from a larger-radius hollow.
This brings us to the greatest challenge of sharpening: it all comes down to personal preference, body weight, ice quality, and playing style, and pros need sharpening tailored to their playing style.
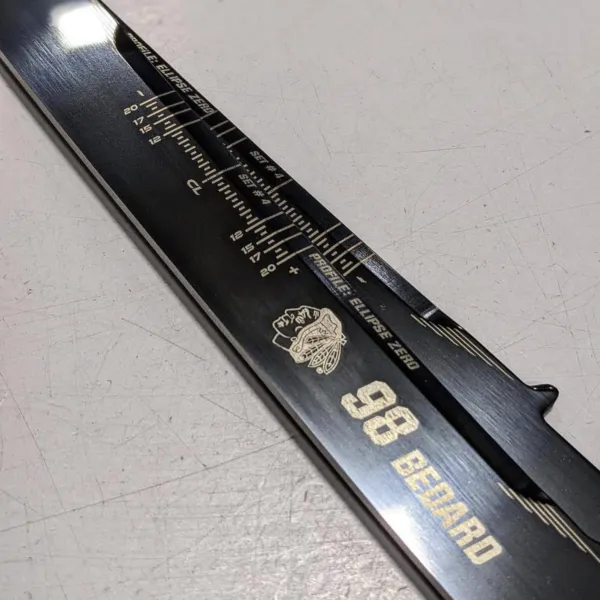 Connor Bedard’s blade, with Prosharp Ellipse Zero profile / instagram.com/prosharpbauer/
The Inner and Outer Edge
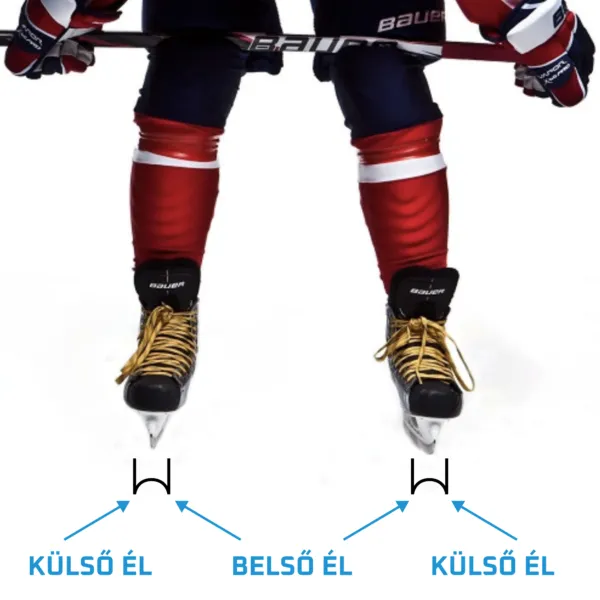 The bottom of the blade is semicircular (hollow), which creates two edges: an inner and an outer. These bite into the ice, enabling turning, stopping, and accelerating.
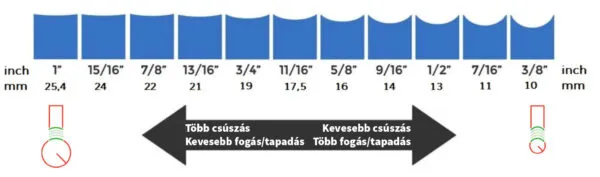
The hollow is the radius of curvature of the bottom of the blade, which determines the depth of sharpening. It is measured in mm, where:
-
Smaller hollow (deeper hollow): Better grip (the edges cut deeper into the ice), ideal for turning, stopping, and agility, but slower glide due to greater friction, so skating uses more energy.
-
Larger hollow (shallower hollow): Better glide and top speed (less friction), but less grip, so harder to take sharp corners or stop quickly.
What Should You Know About the Latest Sharpening Techniques?
The Sparx FIRE (Flat Inside Radius Edges) flat-bottom edge is an alternative to traditional sharpening. Its special feature is that its unique geometry optimizes speed (glide) and edge grip, delivering better performance on the ice.
The optimized flat-bottom sharpening profile creates an excellent balance between glide and grip: the flat center increases the contact surface with the ice, providing a lower friction coefficient (~0.01-0.02 compared to the traditional 0.03) for better speed, while the two edges retain the necessary grip for turns, stops, and accelerations - this is particularly advantageous for fast, agile players. With its better speed and energy efficiency it requires 5-10% less effort to glide, reducing fatigue during longer games.
The center of the edge is flat, so the skate glides better / sparxhockey.eu
The Blade Profile
The edge of the skate blade is curved in side view, so it always contacts the ice surface over only a smaller section. The length of this contact section is crucial for skating characteristics: a shorter profile significantly increases agility, enabling faster and sharper turns, while a longer profile is ideal for maximizing straight-line speed.
Perhaps the easiest way to imagine this is as parking in a packed Christmas shopping mall. With a minibus (long profile) it is much harder to turn into any space than with a small car (short profile). A lesser-known fact is that the Hungarian-developed XC Blade is a pioneer in profile development:
XCBlade in action / Source: xcblade.com
Sharpening - What Hollow Should We Request for the Skate?
In childhood, a larger hollow (18-25 mm) is better for developing agility and balance than a smaller one (9-13 mm). This contradicts the traditional advice of “deeper hollow for beginners,” but an increasing number of power skating coaches and modern experience support this. Why?
With a larger-radius hollow there is less lateral edge grip, making it easier to slide the skate sideways. With a deep hollow the blade bites strongly into the ice, which creates an unstable feeling for beginners, while with a larger hollow the skate slides sideways more easily even with flawed technique. This makes it easier to correct the center of gravity by sliding in the turn, so a larger hollow develops balance and edge use more quickly.
A smaller hollow prioritizes short-term stability but often slows technical development. With the child’s development in mind, a larger hollow (e.g., 16-25 mm) generally allows faster and better long-term development from intermediate level onward (when there is already basic balance), because it forces the child to use correct technique, all with less fatigue and more feelings of success. For complete beginners (under U8 or absolute novices), however, a deeper hollow can provide faster initial learning due to the stability it offers, but the smaller the hollow, the more the skate guides the skater. While the child is learning to skate, controllability is more important.
Talented 5-year-old beginners on an 18mm hollow, in order not to fall over constantly, must:
-
skate with a deep knee bend
-
steer from the ankle and by shifting body weight
-
work with fine edge use
These are precisely the fundamentals that later separate elite skaters from the rest.
If someone learns edge use on a larger hollow by using body weight and ankle work (not by brute edge grip), when later switching to a deeper hollow they will immediately feel the advantage of the extra grip/bite. The other way around (from small to large) is much harder, because the player is “dependent” on the grip and will feel the skate is unstable.
Age/Level Recommended starting ROH Why?
6-10 years, beginner 18-22 mm Maximum tolerance, rapid balance development, less frustration
10-14 years, intermediate 20-25 mm Technique building from body weight, later the hollow can be reduced for full-ice speed
14+, advanced/competitive individual Profile and individual skills are already established, so the hollow suited to the player’s style must be chosen.
Important: Always test new hollows in practice only, not in a game!
Based on factors affecting sharpening, the scientifically recommended solution is to try different hollows :)
Variable Effect on grip Effect on glide
Profile/rocker length Shorter: better grip in corners; Longer: less maneuverability Shorter: less stability and top speed;
Longer: better speed in straight lines
Hollow size Smaller: cuts deeper, better acceleration
Larger: less grip Smaller: more friction, slower glide
Larger: lower friction, faster movement
Player weight Heavier: greater pressure, deeper cut
Lighter: less pressure, shallower cut Heavier: more friction due to greater pressure, slower glide
Lighter: better glide
Skating speed Higher skating speed (e.g., small-ice to full-ice transition) requires greater grip in corners. The better glide of a larger hollow helps achieve higher top speeds, but cornering speed and turning properties influence performance more than top speed.
Ice hardness Hard ice generally reduces grip compared to softer ice, so it is harder to corner on hard ice. Hard ice generally reduces skate glide friction compared to softer ice, so gliding is smoother and faster at typical rink temperatures.
Skating skill Skating skill meaningfully reduces the grip required to take corners. Better skating skill, with more control, brings the advantages of glide to the forefront.
Skate stiffness Skate stiffness primarily affects energy transfer: a stiffer skate more efficiently transmits force from the foot to the ice, minimizing energy loss during the push, which overall increases both glide and cornering speed.
Sharpening Frequency
Frequent sharpening wears down the blade height, but without sharpening there is no on-ice performance. It is recommended to sharpen skates after 6-15 hours of active use. With 2-3 practices per week, 1-2 sharpenings per month is sufficient for younger players, but in older youth (U12-14) the edge can go after 4-6 hours.
If a fresh sharpening before a game unexpectedly worsens performance (due to the stronger edge grip, cornering becomes uncertain, speed drops, or even smooth gliding is disrupted), this indicates that the sharpening does not optimally match the player’s skill level and the current state of the ice (or the player is simply distracted or nervous).
New parameters and types must only be tested in practice, never in a game. The optimal blade character (hollow radius, profile) is improved through sharpening, which is why in the NHL they routinely sharpen before every game as well.
Size, Fit, and Ergonomics
It is important to know that ice hockey skates are generally 1-1.5 sizes smaller than street shoes - for example, if a child wears EU 35 street shoes, the skate will likely be EU 33.5-34, depending on the manufacturer. Always consult the manufacturer’s official size chart, as sizing can vary by model, but do not forget about foot width either: normal (D) or medium (R) is most common in children, but for a wider foot (EE) choose a separate model.
Check the exact fit by trying them on: the skate should fit snugly but comfortably, without pressure or pain. The toes may lightly touch the toe cap, but must not be compressed. The heel should stay firmly in place with minimal movement - if it rises, the size is too large.
For children, growth is a special consideration: leave a maximum of 0.5-1 cm (approximately 0.5-1 size) of room, because more than this worsens performance. For beginners, exact fit is more important than room for growth, since too large a skate makes learning balance and technique more difficult. Always try skates with thin hockey socks (not thick cotton ones) and it is worth trying each size individually, because sizing is not linear and even a 0.5-size difference has a large impact - if you skip one, instability or pain can result. Use a foot scanner if available.
For children, trying sizes one by one is especially mandatory, as their feet grow quickly, but never buy too large - leave a maximum of 0.5 cm of room - because it worsens balance and technique learning.
Skate Too Large
Unfortunately many parents buy skates that are too large due to rapid foot growth, which immediately makes skating more difficult and the player’s value on ice immediately drops. Due to the looser fit, the foot moves inside the skate, especially at the heel, which causes an unstable center of gravity, making balance harder. Since the blade does not react precisely to movement, learning skating technique in an oversized skate is harder and the risk of falling increases. Performance also drops: due to the instability, energy transfer between the foot and blade is weaker, resulting in slower cornering and weaker acceleration.
Is It Worth Buying a More Expensive Skate?
Not all hockey skates are the same; True, Bauer, and CCM primarily optimize their product families based on player needs:
-
speed and agility
-
power and protection
-
versatility and comfort
-
as well as customizability
Whether to buy the most expensive skates depends on the player’s level, budget, and the intended duration of use. In general, it is not worth it for beginners or juniors, but it is for advanced players and pros, because the difference in performance (energy transfer, weight reduction, durability) can be significant:
Who Does the Difference Matter To?
-
Beginners and juniors (e.g., 9-14 year-olds, amateur level): It is not really worth buying top models, because the foot grows quickly (1-2 sizes per year), and expensive skates quickly become the wrong size. The mid-range provides nearly the same protection and performance as the top range, but more affordably. For example, the mid-range offers 80-90% energy transfer, which is more than enough for technique learning. The stiffness of top-range skates can actually hinder ankle mobility and balance development, which is often counterproductive.
-
Advanced and recreational players: It is worth considering top-range if you train 4-5 times per week, as the lighter weight and better energy transfer can improve cornering speed and acceleration by up to 10-20%. However, if you only play at a hobby level, mid-range skates offer better value for money, as the difference is not always felt.
-
Professional or elite-level players (e.g., junior leagues, NHL-style): Top-range is fully worth it (e.g., True SVH Custom) - customizable, ultra-lightweight (700-800 g), and provides better protection.
 Advertisement
Don’t Save on Size
A much better choice is a used but correctly-sized skate than a larger-sized, more expensive new model, since fit is the most important factor for performance and safety. The advantages of used skates include that they are cheaper (50-70% discount), and from professional sources can often be obtained in nearly new condition.
Heat Molding (Baking) Ice Hockey Skates
Once you’ve bought them, it’s time for heat molding, which most shops can do for you right away.
Heat molding is important for exact fit and improves comfort, performance, and stability. This is especially important for children, for whom exact fit is essential for developing balance and skating technique. During heat molding, the skate is heated in a special oven to 80-90°C over 3-8 minutes - the exact time depends on the manufacturer. Under the heat, the skate’s inner lining and sometimes the outer shell become more flexible, allowing them to conform to the foot. The player then puts on the skate, laces it tightly, and stands or sits in it for 10-30 minutes while the lining and shell mold to the exact shape of the foot. At the end of the process the skate cools down and the shape sets.
 Baking skates / wikihow.com/Bake-Hockey-Skates
Can You Bake Skates at Home?
Heat-moldable ice hockey skates can be baked at home, but only according to the manufacturer’s recommendations, otherwise they can be damaged:
-
Preheat the oven according to the skate’s instructions (generally to 80-95°C),
-
Loosen the laces and place the skates on a baking sheet (not directly on a rack, to avoid deformation).
-
Heat for the manufacturer-recommended duration (generally 5-8 minutes), watching to ensure the boot becomes softer but does not melt (baking should not exceed 10-15 minutes).
-
Have the child sit down and put on the skate with thin hockey socks, lace it tightly, and sit in it for 10-30 minutes so that the heat-moldable material conforms to the foot.
-
After cooling, it is generally recommended to let the skates rest for 24 hours.
-
If the baking is not perfect, the whole process can be repeated, but a maximum of 2-3 times.
For children, multiple heat-molds are crucial, because due to their rapidly growing feet a loose fit worsens balance and increases the risk of blisters and injuries.
By baking, the skate can be partially adjusted to the child’s growing foot, thus extending the skate’s lifespan. For 0.5-1 cm of growth, baking can refresh the fit, avoiding the immediate purchase of new skates, however the number of bakings is limited as some materials (e.g., composites, epoxies) degrade, worsening stiffness.
Signs of heat molding are visible on used skates: indentations or impressions can be seen on the lining matching the previous owner’s foot shape, especially around the ankle or heel area; the outer shell may show slight deformations; the lining may be harder or spongy; and wear on the eyelets can indicate previous use. When trying on, it is possible to feel if the skate was molded to a different foot, which can cause pressure points.
Socks
Thin hockey socks are best for skating, as they provide a snugger fit, better energy transfer, less friction, and better comfort. In contrast, using thick ski socks is not recommended at all, as they worsen fit and performance and increase the risk of injury. Due to the extra volume of ski socks, the foot “floats” in the skate, which reduces energy transfer and balance. This makes cornering slower and also reduces explosiveness. Wool does not wick moisture: it increases friction, blister formation, and foot cooling in the cold of the rink.
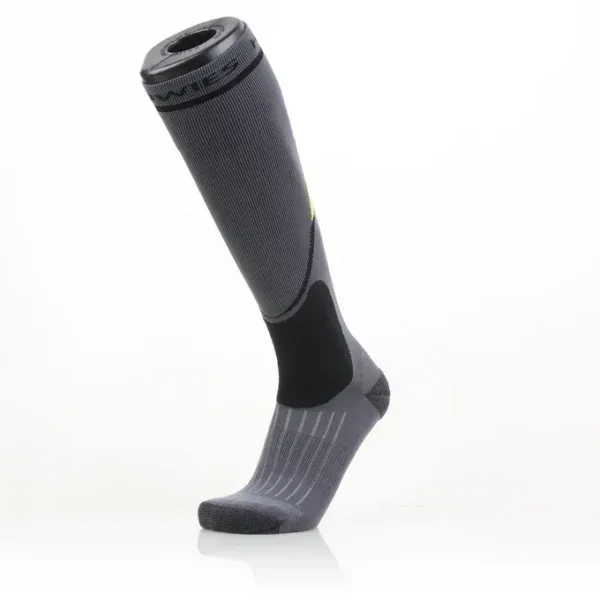 HOWIES PRO STYLE Skating Sock / Jégvilág Hockey
During a longer on-ice session (2h+), sweat will cool the foot, which can cause serious pain for the child. Compared to thick ski socks, a better choice is the thin, moisture-wicking hockey sock, which ensures snug fit and comfort.
Skating without socks is rare, mainly occurring at the professional level, but is not recommended for children due to the risks of blisters, cold, and hygiene.
 In the 25/26 season, numerous Icehockeypro57 training sessions are available at the Pesterzsébet Ice Rink: Monday, Tuesday, Wednesday, and Friday at 13:00, 14:00, and 15:00; Thursday also at 16:00; Saturday afternoon by arrangement; and Sunday at 7:00, 8:00, and 9:00. Additional training opportunities are available in Óbuda, at the Kisstadion, and in Dunaújváros, by arrangement.
Training formats include 1:1 coaching, offering personalized development; small group training with 2-6 players; and large group training open to both skaters and goalies. Goalie training options include individual sessions with a goalie coach, and group goalie sessions where one coach works with three goalies. Training types are varied: skating instruction and technique development, skill training to strengthen individual abilities, dry training and dry shooting training, training following the Canadian model, and the ELITE SKILL CLINIC, providing high-level and intensive development.
More information and registration: https://www.icehockeypro57.hu/hu/